Rear Lights Box v1.0 for US-spec imported vehicles
– from IRON GATES –
The Rear Lights Box makes it easier for auto workmen to adapt US style red turn / brakes indicators to EU style red brake lights and amber turn lights.
Shown below is the unit’s operating state diagram. Going from one state to the other is made sequentially as the arrows depict and it is accomplished as described further below.
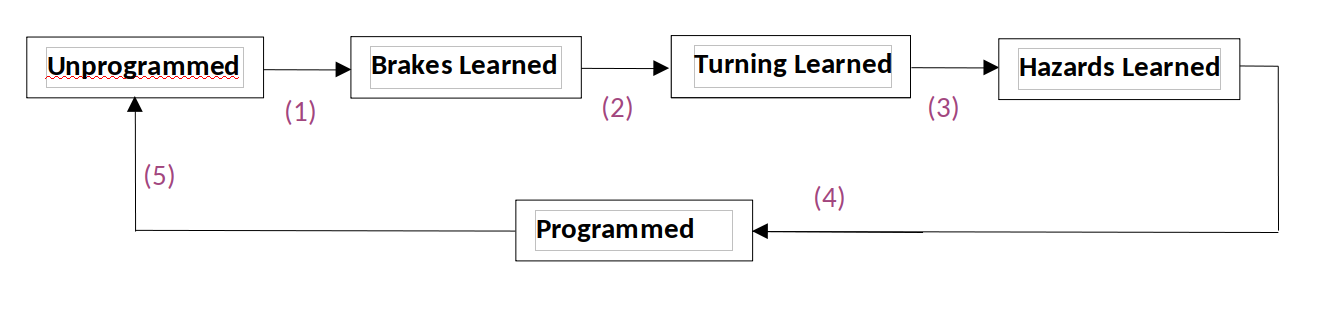
- Press the brakes once.
-
Actuate any one of the two turn signals for precisely 10 blinks.
-
Actuate the emergency lights for 10 blinks.
-
The device automatically goes into its normal state (Programmed).
-
If need be, reset the device back into its Unprogrammed state by first powering it up from the right turn signal (only, not through other means), then use a thin tool to press the button through the hole on the front side.
Notice: Whenever the device is not in its Programmed state, whatever causes one of the lights (brake or turn) to come on will also light up the other light on the same side.
Physical Installation
-
Remove the plastic covers inside the boot and look for a place to mount the box
-
Look for a place that has a large air pocket around it when plastic covers are reinstalled; even better when there is (are) a hole(s) in the plastic cover as it helps the device run a bit cooler. Not mandatory.
-
Device front side is the wide face with a screw sticking out; the enclosure also acts as a heat sink and the front side should always be the one exposed to the largest amount of air
-
secure the device into place (double / single adhesive tape graded at -40C … +150C or some other way that you see fit), then cut the wire loop appropriately so each of the two resulting cables can reach where it needs to reach: one to the rear left lights, the other to the rear right lights
-
The black wire inside right / left 3-wire cables resulting from cutting the loop is the input, brown for the brake output and blue for the indicator output.
-
For the two wire cable, blue is GND and brown is for the third brake input. Tapping the third brake light is not mandatory but it makes the lights snappier; have a look on the website under “Setup Videos and Demo” and check the two workbench demonstrations where the 3rd brake light is or is not tapped
-
How the wire splicing / tapping is carried out is up to you, the installer, but do check the warranty conditions below! Don’t forget to also secure the cables to the boot 4 / 5 times per meter.
Troubleshooting and returning the device
In case of any trouble please visit the website https://rearlightsbox.eu – “Contact” section for assistance. I’ll be answering in English and Romanian.
There are 5 years of warranty for the device. With some conditions:
-
The boxes are not waterproof; submerging them voids warranty
-
Damage caused by bad electrical connections also voids warranty
In order to establish if any of the two conditions have occurred I need to see a video dismantling the box. Open the device, film its inside and outside, undo the electrical connections and zoom in around them enough for corroded / burnt / clean wires and contacts to be visible.
Returns for any other reason than a faulty unit are accepted within 60 days of receiving the device. It must be in operational condition and physically not damaged. It should be noted that the return fees are at customer’s expense. This also refers to any taxes I might be required to pay at the Post Office.